Why Does It Show a Grey Screen When I Upload to Cricut
Hi Daydreamers!
On today'south tutorials you will be learning how to contour in Cricut Pattern Space like a Pro and we will likewise be checking out why is that sometimes the contour tool doesn't seem to work.
Before we get started, allow's see a quick overview of what Contour is.
Contour, in Cricut Pattern Space, is a tool that allows yous to delete/hide unwanted pieces from your projects. This option is extremely powerful because you lot tin can modify your projects to create a whole dissimilar effect or feel.
If yous are a beginner and are still figuring out Cricut's software, I recommend that you read my fantastic andUltimate Cricut Design Space tutorial.
I personally employ Contour all the fourth dimension, and on this tutorial, y'all'll find out why!
Tip: if you want to larn everything you lot need to know about iron-on (HTV) and master how to employ it on different surfaces, make sure to cheque this amazing tutorial I put together.
Why is the Profile tool not working?
Usually I cover why tools aren't working at the end of my tutorials. But, in this instance, I notice it necessary to mention it at the offset, and then we tin continue the rest of our tutorial with the correct set of listen.
First of all, the problem is non that the contour tool isn't working. What is happening is that yous aren't using it the right way.
Here are some things y'all need to proceed in mind:
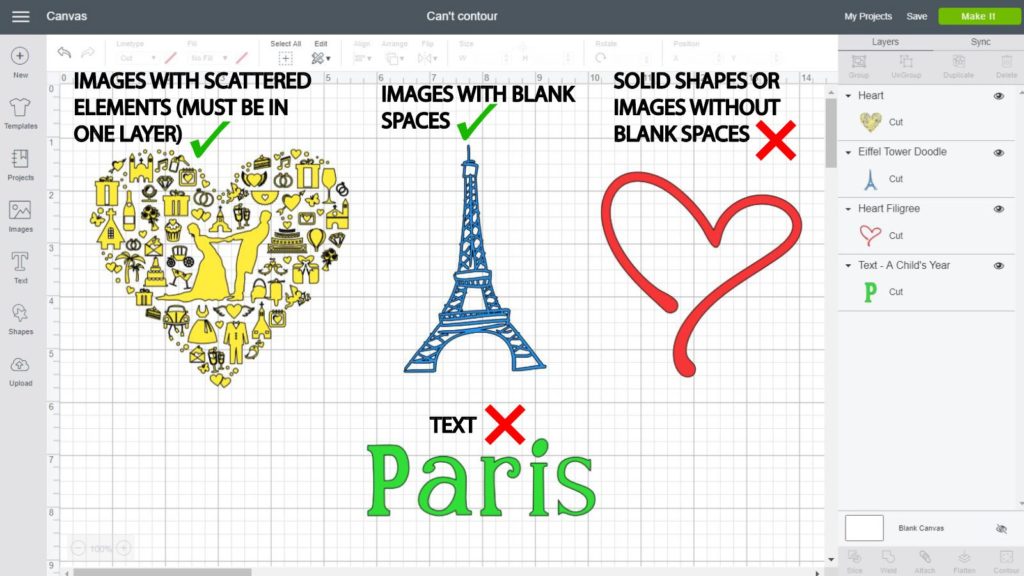
- Contour doesn't work on images that DON'T accept loose/scattered elements or holes/bare spaces inside them.
- You can't Contour obviously text (I have a footstep by stride down beneath that shows you how to accomplish this)
- Contour only works with one layer at the time. So if you lot have more than i layer selected the tool won't activate. If y'all need those two layers together, you lot will demand to weld them first.
- Contour merely works with SVG or cut files. Even if your PNG or JPEG images have blank spaces or loose/scattered parts, the profile tool won't work on them.
These are the reasons why your profile tool may non be working. Yet, if yous find yourself in a unlike situation, delight comment at the end of the post and then I tin accept a look and see why isn't working for y'all.
How to Use the Contour tool in Cricut Blueprint Space
Now, we are most to get into some pretty absurd stuff so you can learn how to use the contour tool like a pro!
In a nutshell we will be covering:
- Contour Basics: where the tool is located, and the profile window.
- How to Apply Contour with Images
- Modify image colour with contour
- Using contouring with text (there are some extra steps y'all need to exercise)
Contour Basics in Pattern Infinite
As I mentioned before, Contour is used mainly to hide or delete unwanted pieces of an image or design.
To activate the Contour tool, select the layer or epitome (only one at the time) yous want to edit and click on the profile tool located at the end of the layers panel.
Check out the following screenshot (not the cutest design, I know) to see all the things nosotros can practice by just using contour.
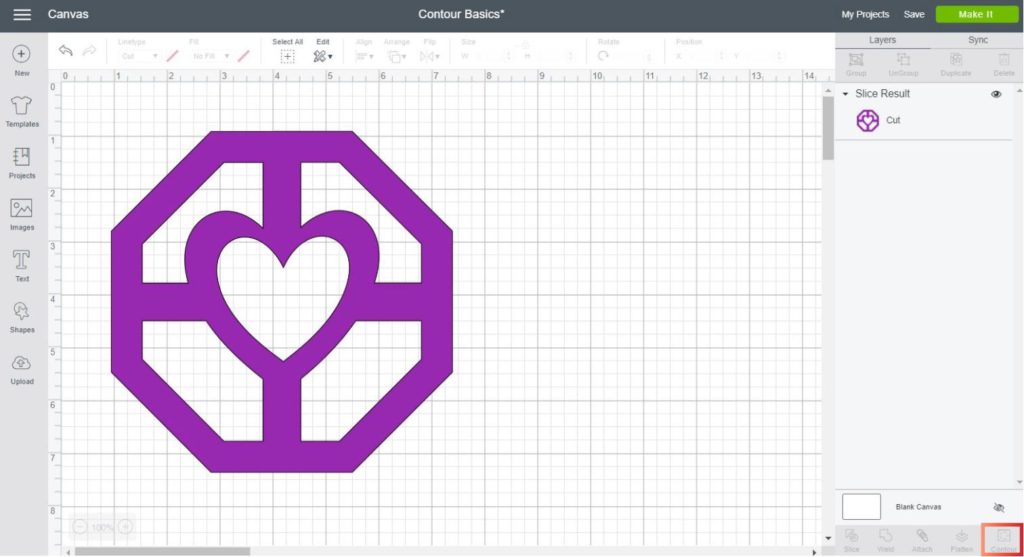
Every bit you can come across this image has multiple holes and blank spaces that tin be deleted.
One affair that's actually absurd about this tool is that y'all can turn blank spaces (holes) into active parts of the design and hide the agile parts of the blueprint and plow them into blank spaces (holes)
I know information technology sounds a little complicated, merely it volition make sense in a second.
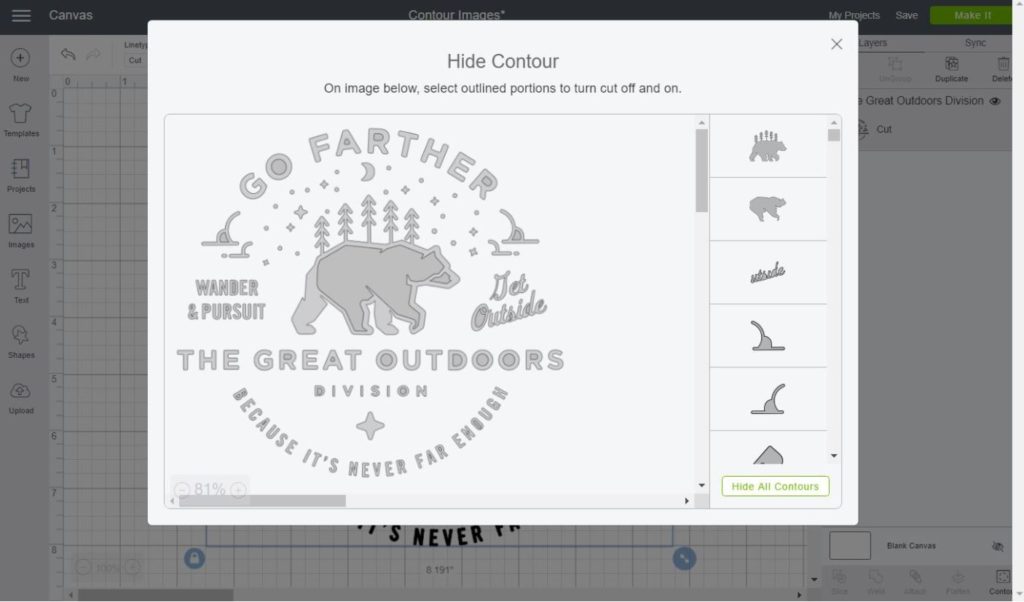
When you click on contour a window will open were you will be able to edit your epitome by showing and hiding sure parts of it. Permit'south dissect this footling window and then y'all take advantage of everything that the profile tool has to offer.
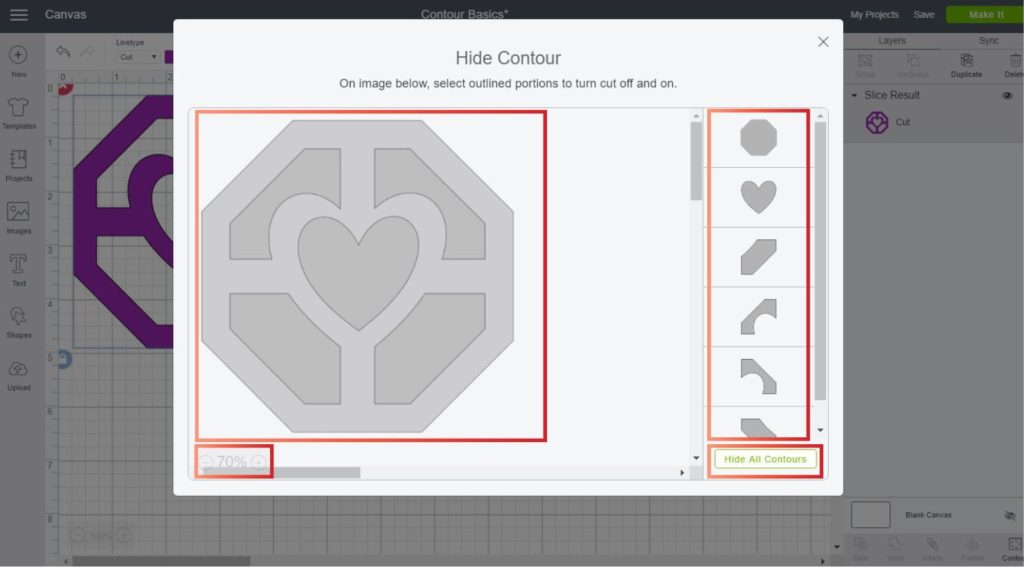
Image Area: Here you lot can see the image you desire to contour, each scale of greyness represents a carve up element that you can click on to either hide or show. The grayest color represents the blank spaces or holes of your image.
Zoom: If you desire to fit your prototype on the contour window, zoom out to have a improve perspective. Or, if y'all are working on a very intricate design, zoom in to select what you want to hide/show.
Individual choice Panel: You can select the piece you want to contour on this panel. When you know what you're looking for this tin can be quite handy. Yet, I don't use it that much because it'southward hard to visualize what you are doing.
Hibernate/Show all Contours: This little button is very useful, particularly if you lot have a lot elements y'all can and desire to contour on your epitome.
For instance, if your layer has 20 elements and you only want to show 3, then it's better to click on "Hibernate all Contours" then to click on the 3 y'all want to show.
After hiding all contours, the button will change to Prove all Profile.
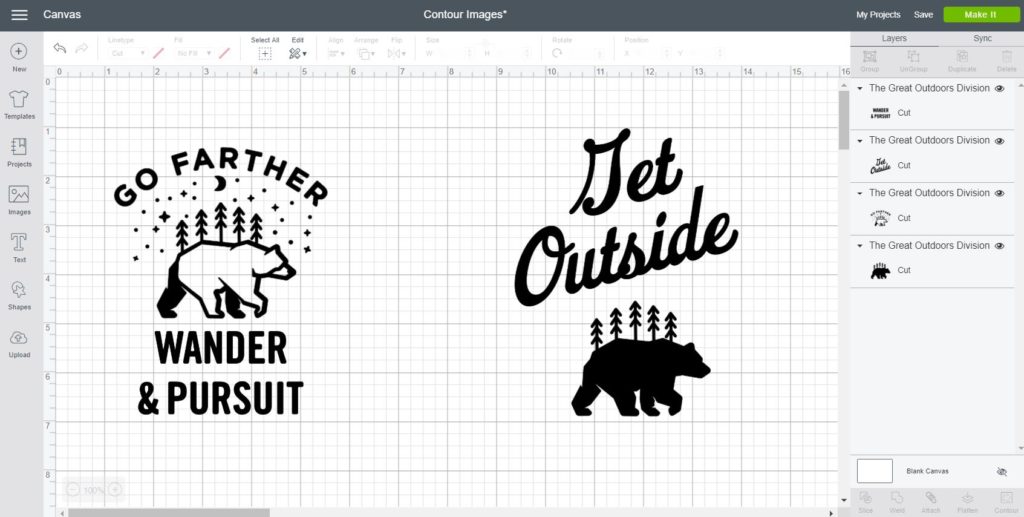
Now, await at all of the things I was able to do with simply that elementary design! I copied and pasted it simply so I could change the contour options of each one of them.
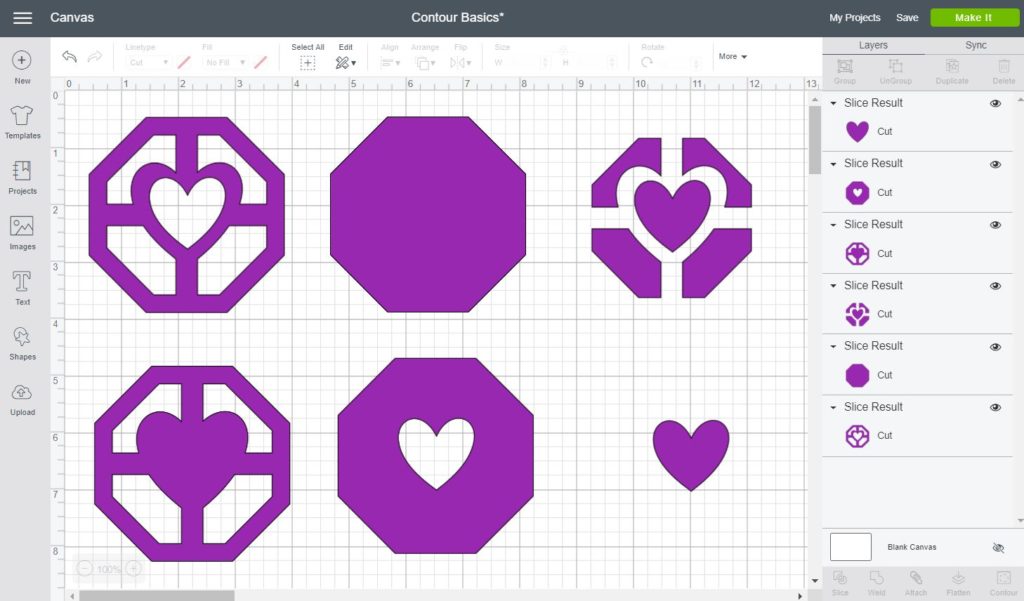
From ane single Image I was able to create another 5. And I could've washed more of them, just I just wanted to brand a point.
How to use Contour with Images
Now, nosotros are going to bank check out how to use contour with images. Y'all can do this with i of Cricut'due south images, or with your own besides. Though, keep in heed that you tin can simply use SVG or CUT files.
If you lot desire to recreate this part of this tutorial, click on Images located on the left panel of the canvass expanse, then copy and paste this lawmaking #M71A34B3 on the search box.
When the image appears, select it and click on Insert.
Take a await at the image. What do you notice?
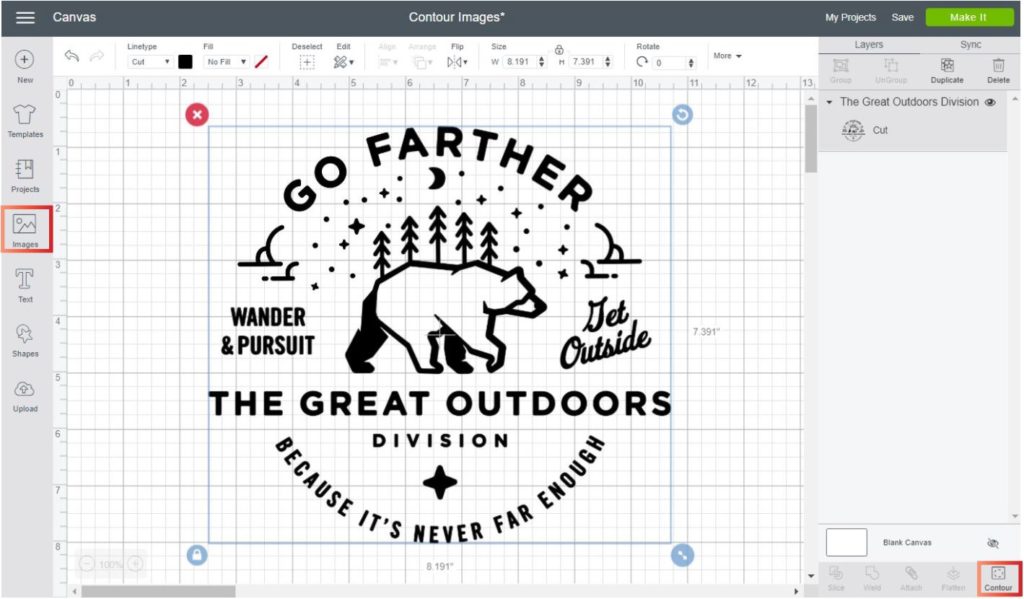
Beginning off all, at that place are many elements, footling and big that are office of the design, and secondly, since the image is in a unmarried layer we can employ the contour tool.
When you click on contour, expect at all of the things you can hide, and too show. For instance, y'all can cull to merely show the bear, or the stars. Or just function of a phrase.
From the original image, cheque out all the unlike options I came out with in just about iii minutes.
Isn't that awesome?
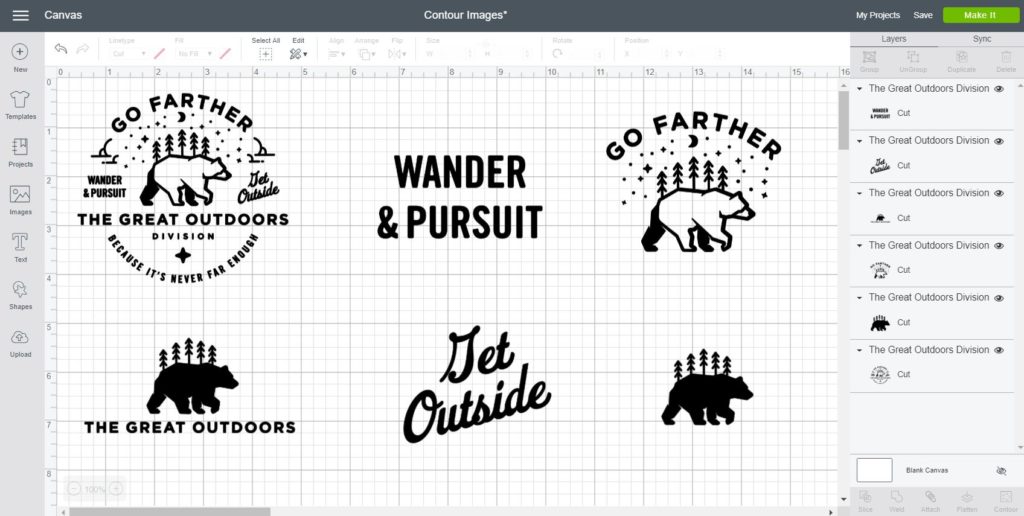
What about combining ii unlike contours?
I am still amazed of all the things y'all tin exercise. Can you lot believe that you tin can overhaul an image to create something totally different.
The post-obit designs, were made by contouring, resizing, and finally combining the original prototype.
How to Change Colors using the Contour Tool
Have yous ever seen and image that you would like, simply when you insert it is just i layer?
I know, it'southward frustrating!
Say good bye to your frustration because with the contour tool you can modify the colors of your images very easily.
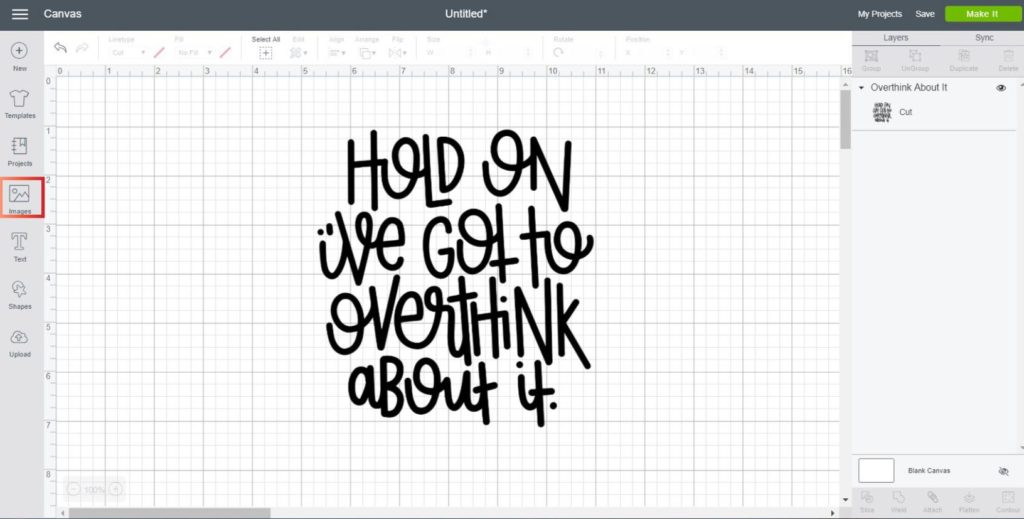
To follow forth click on the images button located on the left panel and search the following code: #M105AD97. And then select the design and insert the image in Cricut Pattern Infinite.
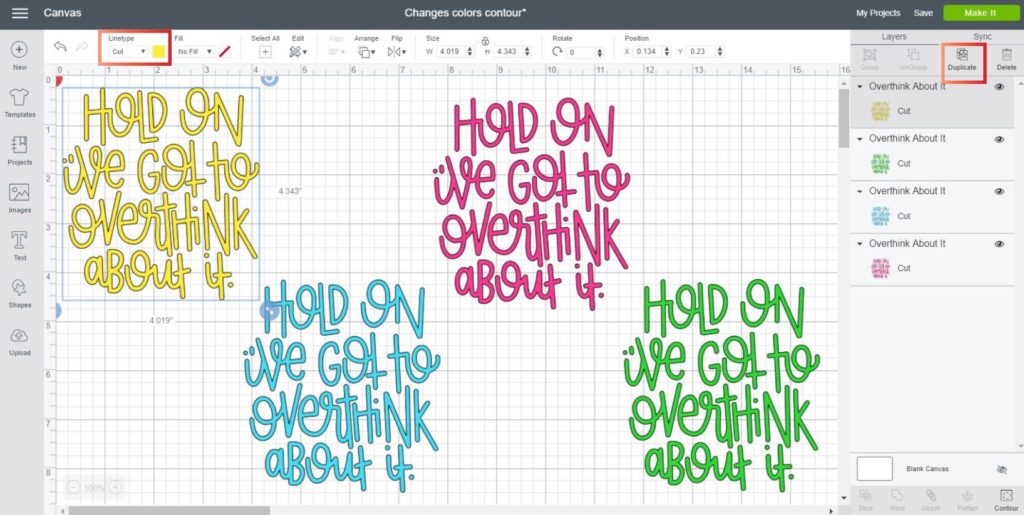
One time you insert the image, select it and (copy paste) duplicate information technology. The idea is to have a copy for each colour you want to use.
I wanted a unlike color for each line, and so I re-create and pasted until I had four exact duplicates.
After you finish doing that, change the color of each image by selecting it and irresolute the color box side by side to linetype on the pinnacle menu.
Once you have all of the duplicates with the color yous want to employ, select all of the images and click on align (located on the top panel of the sail surface area) and select the option centre.
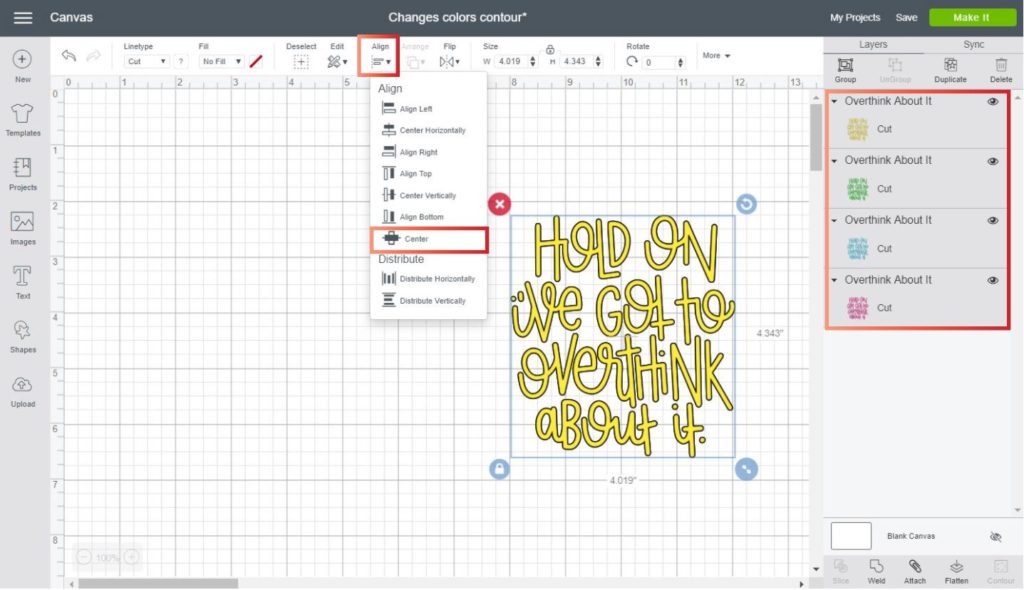
At this point you lot will only come across one of the images, but behind it you'll have the other three. Here's the thing, if you effort selecting from the canvas, you will ever select the 1 on the forepart.
So, when trying to contour each image, select it from the layers panel (located on the right console of the sail)
Now, we are going to profile each prototype hibernate/delete everything we don't want in a particular colour.
To do this, select ane epitome at the fourth dimension and click on contour. On the following screenshot I have the colors I used for each line.
- Agree ON: Click on the yellow layer and hide all other lines
- I'VE GOT TO: Click on the bluish layer and hide all other lines
- OVERTHINK: Click on the pink layer and hide all other lines
- ABOUT IT: Click on the greenish layer and hide all other lines
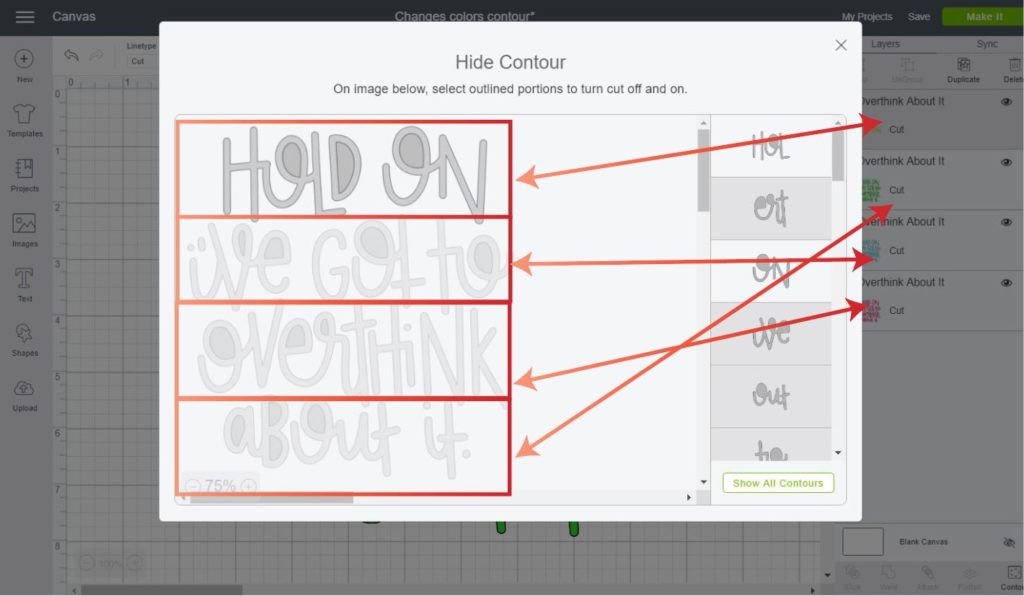
Tip: Since you volition be hiding, more than showing. I recommend yous to click on hide all contour, then manually click on the line you want to keep.
This is how the pattern will look at the end!
Doesn't information technology wait pretty?
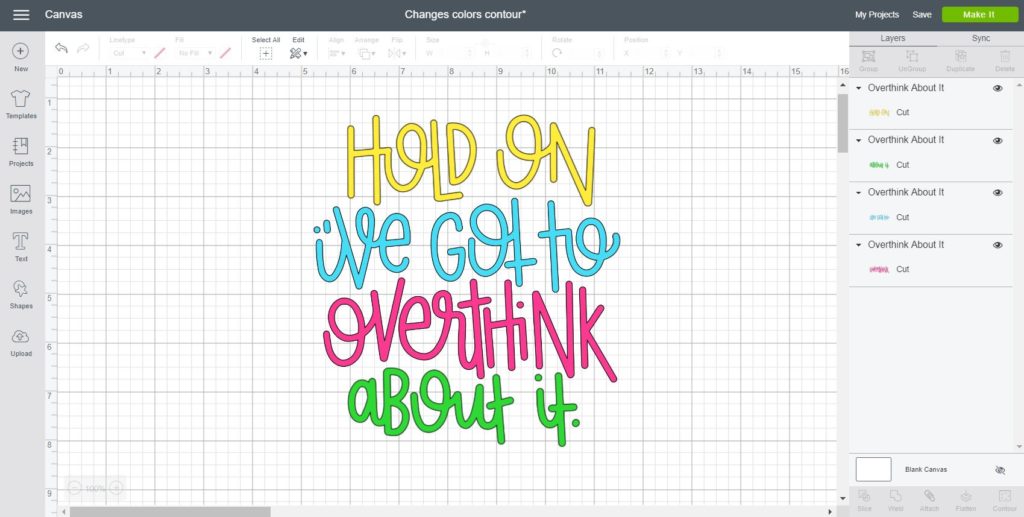
Notice each layer on the layers panel. Each image is showing, the line yous picked.
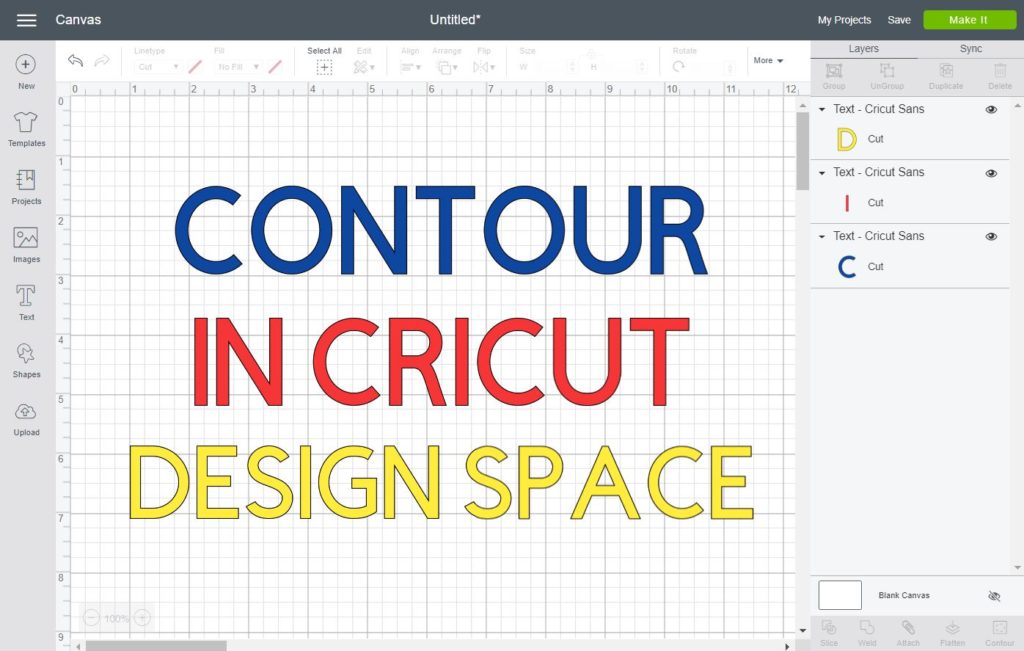
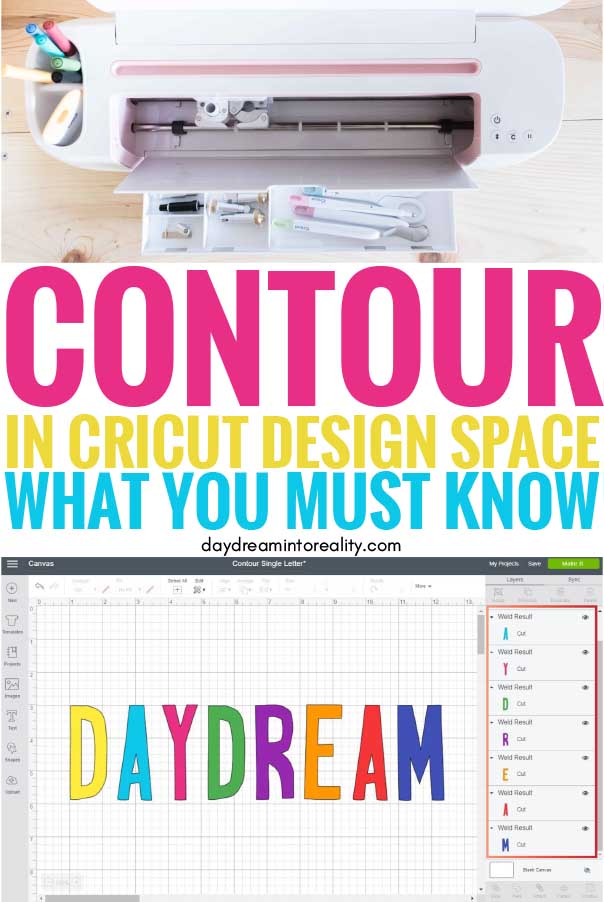
How to Use Contour with Text
To finish up this tutorial lets see how to contour text in Cricut Design Space.
Past default you lot tin can't use the contour tool on text.
Why?
I honestly don't know, but my all-time estimate is that text is dependent on the font itself, and with contour you'll be modifying information technology and so much that the programme can't really accept it.
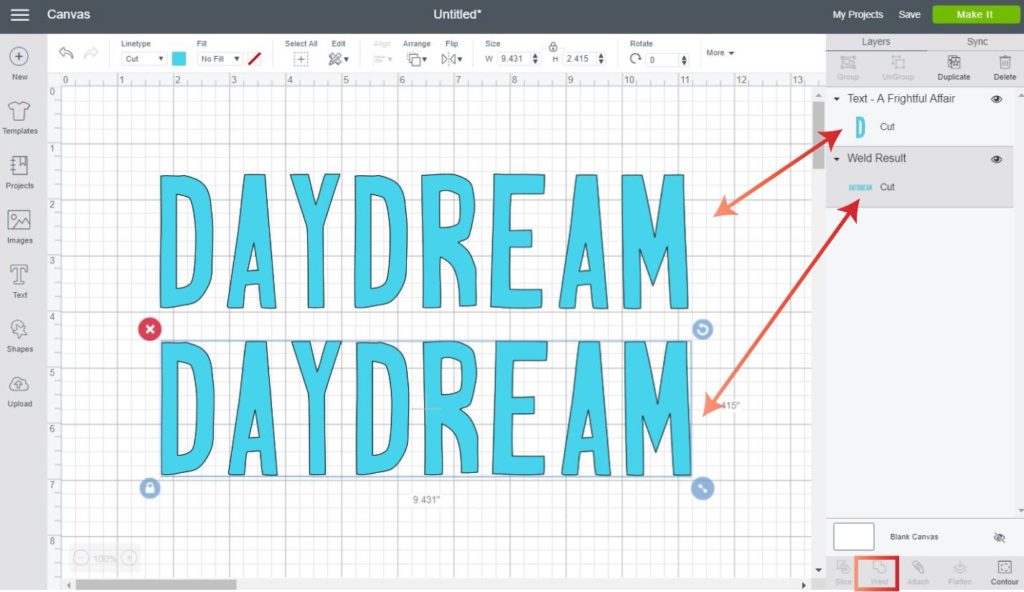
In lodge for yous to exist able to profile text you lot need to weld it!
To exercise this, only select the word or text you desire to use and click on the weld button located at the lesser of the layers panel. After welding you can now profile your word, and get rid of letters, or blank spaces on your text that you don't want.
Note: Continue in mind that you lot won't be able to edit that text after you weld. And so if you retrieve you'll demand it down the road, save a re-create of it.
Yous tin also repeat the process of copying and pasting the same design to alter colors (like I explained to a higher place).
Await how it looks with different colors!
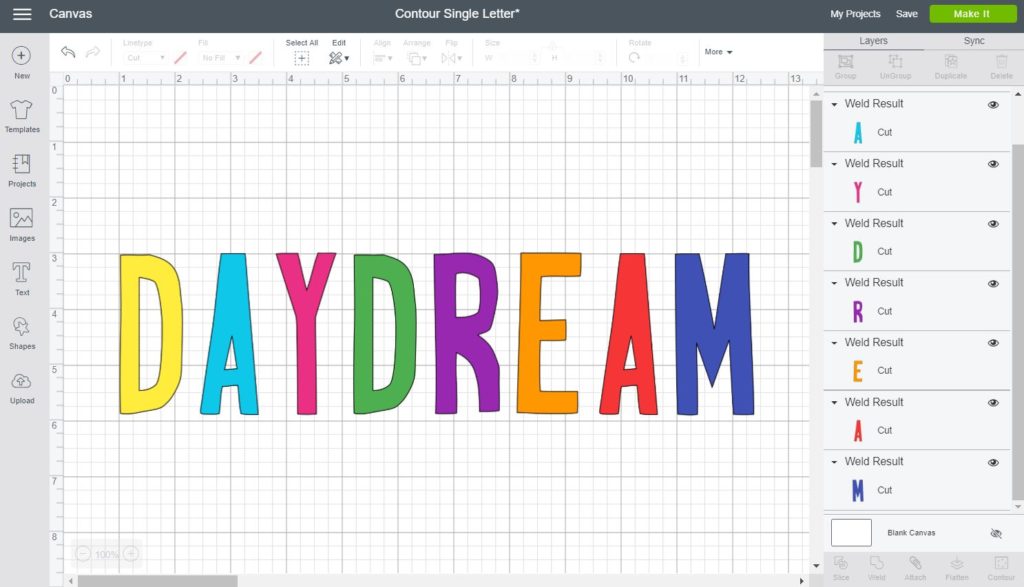
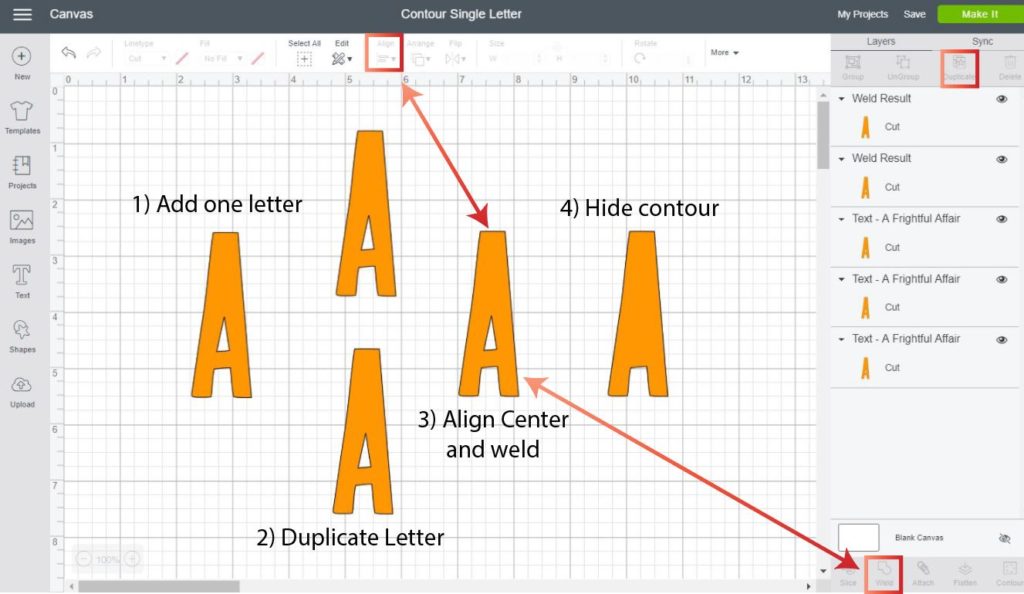
Before we end this tutorial I wanted to point out that if you want to contour a single letter Design Space wont let y'all weld.
Ahggg… I know!
No worries though, y'all have two options here:
- The commencement choice is to just write a word with two letters, and then weld and with the contouring tool, delete the letter you didn't want in the offset place.
- The second option (cheque screenshot down blare) is to duplicate the single letter of the alphabet you want to apply, then marshal both copies centre, and finally weld them both. Later on welding, you will be able to employ contour with no problem.
Congrats!
If you followed this tutorial, let me tell y'all that y'all are a PRO at using contour in Cricut Blueprint Space.
The question is… How are you going to utilise this tool from at present on? Let me know in the comments bellow.
Source: https://www.daydreamintoreality.com/contour-cricut-design-space/
0 Response to "Why Does It Show a Grey Screen When I Upload to Cricut"
Post a Comment