How to Upload Pictures From Camera to Computer
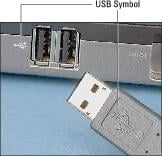
- Connect the camera to the computer via USB. USB stands for Universal Serial Motorbus, which is a technology developed for connecting printers, cameras, and other devices to a computer. A USB port is a slot on the computer where you can plug in a USB cable. Here's a close-up wait at a USB plug and ports, which are typically marked with the symbol you lot see below.
Nigh card readers and cameras connect to the computer via a USB cable.
- Use a card reader. A card reader is a device that enables a computer to access data directly from a memory carte du jour — no photographic camera or battery power required. You but take the card out of the camera and skid it into the card reader when you want to download photos.
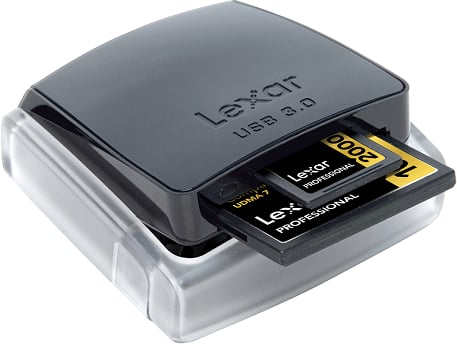
Courtesy of Lexar Just push the memory card into the matching slot on the card reader.
- Transfer wirelessly. Cellphones and other smart devices can connect to your computer wirelessly, assuming that your figurer itself is function of a Wi-Fi network. Y'all too may exist able to use Bluetooth, another wireless data-transfer technology, to connect your smart device to your computer.
- You see an icon representing your camera or retentiveness card on your computer desktop or in the file-management window. For example, here is a bill of fare reader which shows upwardly as a drive on the desktop on a Mac reckoner. In some cases, the camera brand proper name appears along with or instead of a drive letter of the alphabet. (The drive letter will vary depending on how many other drives are on your system.)
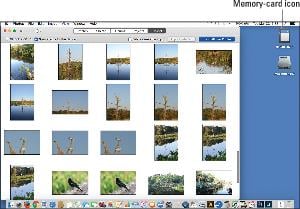
The memory bill of fare appears as a regular bulldoze on the computer.
- On a computer running Windows, a Windows bulletin box similar to this one appears. The figure shows the dialog box as it may appear in Windows 7 (the box changes depending on your computer settings). From this window, you tin choose from programs that the organisation believes can handle image file transfers.
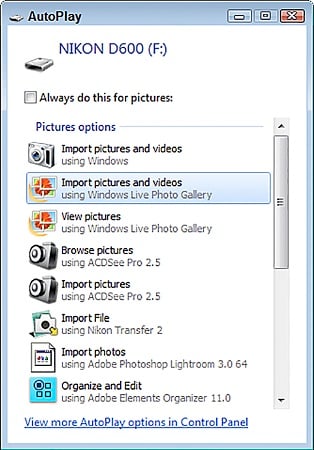
Windows 7 may display this initial boxful of transfer options.
- An installed photo program automatically displays a photo-download wizard. For case, the downloader associated with your camera software (assuming that yous installed that program), Adobe Lightroom, iPhoto, or another photo programme may bound to the forefront. Usually, the downloader that appears is associated with the software yous most recently installed.
Just if yous prefer, you lot can simply stick with Windows Explorer or the Mac Finder and use the same drag-and-drop technique that you lot use to copy files from a CD, DVD, or another removable storage device to your reckoner. Normally, you accept to open a folder or two to become to the actual epitome files:
They're typically housed inside a main folder named DCIM (for digital photographic camera images) and then within a subfolder that uses the camera manufacturer'due south proper noun or folder-naming structure. After you open the binder, y'all may see thumbnails of the images or simply the names of the files.
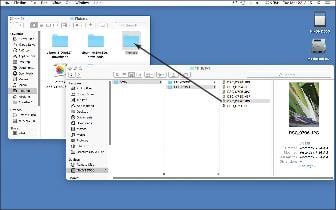
On a Mac, you tin drag and drop files from a retention card using the Finder.
Afterward opening the folder that contains the images, select the ones you desire to transfer and then only elevate them to the binder on your hard bulldoze where you desire to shop them. Although it'due south not visible in the figure, yous should come across a little plus sign adjacent to the cursor when you drag. The plus sign indicates that yous're placing a copy of the pic files on the computer; your originals remain on the card.
A few final downloading tips apply no matter which method y'all use:
- You don't have to use the same program to edit photos that yous use to download them. You can download using your camera's photograph browser, for example, and so open up and edit the transferred photos in Adobe Photoshop. In some cases, you get-go need to import or itemize the transferred photos into the program, which simply tells the program to build thumbnails for the picture files.
- Scout out for the erase-afterwards-download option. Many photo downloading tools offering to automatically erase the original images on your card after you transfer them to the computer. Disable that choice just in case something goes haywire. It's not a practiced idea to erase the images on your card until y'all're confident that they're safely stored on your hard drive.
- Also disable automatic cherry-heart correction. Many downloaders likewise try to try to remove carmine-centre during the download process. This option can crusade your downloads to have forever every bit the program tries to locate and fix areas that it thinks may exist cherry-red-heart. It's better to do the job yourself later on downloading.
- You may be able to copy photos to a backup drive at the aforementioned time you copy them to your main storage drive. This feature, constitute on some photo downloaders, is a great timesaver, for obvious reasons. The initial download may take a bit longer because files are being written to ii locations, simply you don't accept to take the time to select and copy photos to your backup bulldoze later.
Near This Commodity
This article can be found in the category:
- Full general (Photography) ,
Source: https://www.dummies.com/article/home-auto-hobbies/photography/general-photography/transfer-photos-digital-camera-computer-225905/
0 Response to "How to Upload Pictures From Camera to Computer"
Post a Comment